How to Live Stream with an External Camera
With free live streaming on TeamSnap ONE, you can stream directly from your phone or external camera, so your teammates and family never miss a game, even when they can’t make it to the field.
From rainy Saturdays to packed sidelines, TeamSnap ONE makes it easy to capture every play in high definition and share it instantly with parents, grandparents, and teammates. Coaches can review key moments, families can relive highlights, and everyone stays connected.
External cameras make live streaming even more reliable and flexible.
By using a dedicated external camera from brands like XBotGo, GoPro, Mevo, or any other brand that supports RTMP streaming, instead of your phone, you can create a better streamer experience while delivering the same experience to everyone watching via the TeamSnap ONE app.
This guide walks you through setting up and using an external camera for live streaming.
External camera streaming is currently supported on iOS and Android devices.
Tip: Before you go live with your external camera setup, use Test Live Stream Mode to verify your RTMP stream is coming through correctly.
Why LiveStream Using an External Camera?
Use an external camera if you want to:
- Keep your phone free during games
- Use a camera you already own (GoPro, XBotGo, Mevo, etc.)
- Record locally to an SD card
- Mount your camera in the best possible spot
- Run longer streams without worrying about battery
- Stream from multiple devices concurrently
The live stream viewing experience stays the same for families. The setup just works better for you.
Step 1: Start From Your Game in TeamSnap ONE
- Open the TeamSnap ONE app and click into your upcoming or recently started game
- Tap Live Game and then Live stream
- Choose your video quality:
- Standard (480p)
- HD (720p)
- Full HD (1080p) - Requires TeamSnap+
- Tap “External Camera” instead of “This device” when asked for your video source
- Tap Next

Step 2: Get Your Event-Specific RTMP URL
On this screen, you’ll see:
- A “Full RTMP(S) URL,” “Stream URL,” and “Stream Key” for your stream
Important details:
- The details on this screen are event-specific: each event has its own RTMP/ RTMPS URL, Stream URL, and Stream Key, and you must repeat this step for every new event you live stream.
- You may need to jump to Step 3 and return to this step to confirm what details you need to copy over
Copy the Full RTMPS URL you see on this screen. You’ll paste it into your external camera app next.
FYI: RTMP = real-time messaging protocol. It’s a method for sending data, such as video, to a streaming platform. This technology allows you to connect your external camera to your phone and the TeamSnap ONE app.
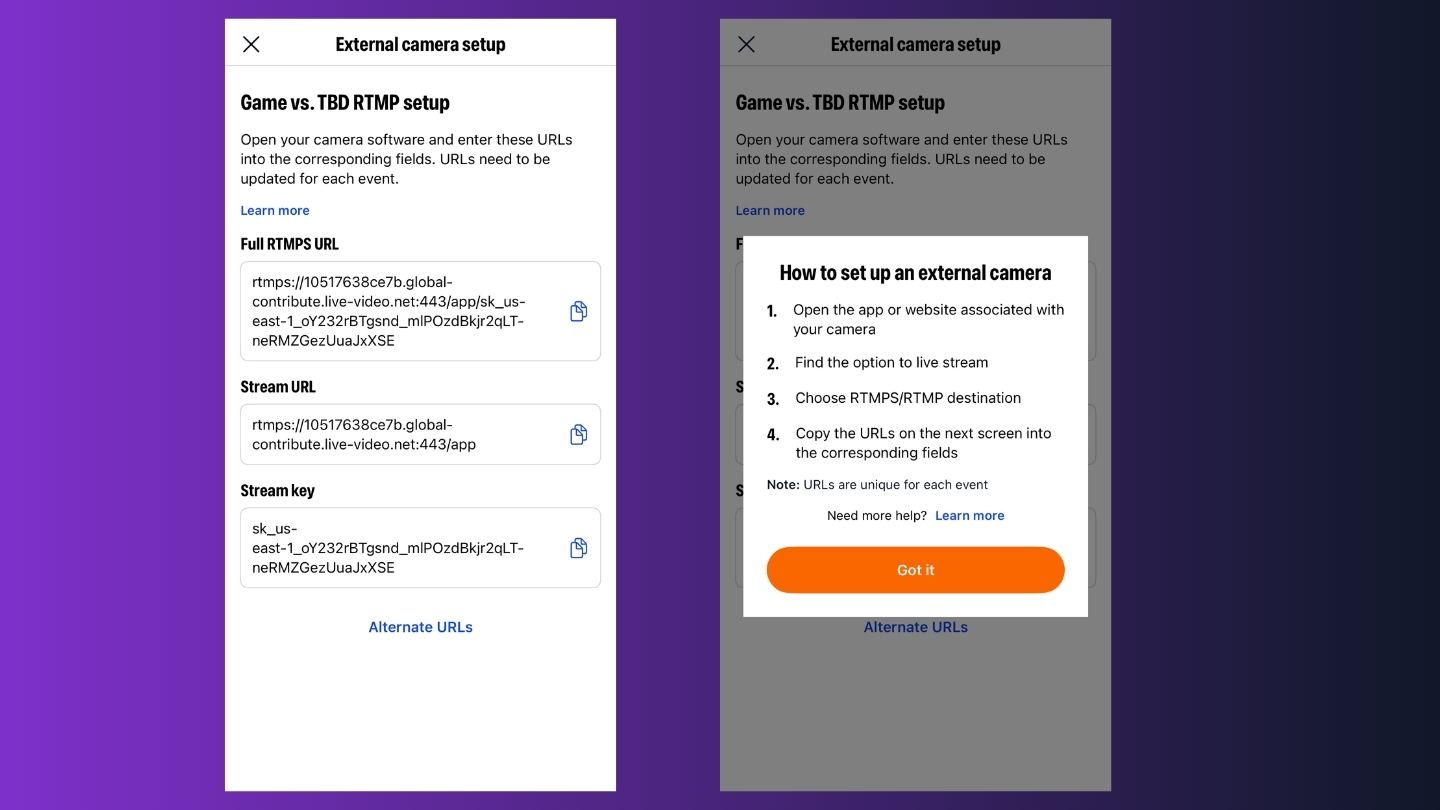
Step 3: Set Up Your External Camera
- Open your external camera app
- Connect to your camera
- Find the option to Live Stream. (Please note that you can live stream with any camera that supports RTMP live streaming, not just the camera brands called out below)
- XBotGo
- GoPro
- Mevo
- Veo
- Pixellot
- Spiideo
- Hudl Focus
- NearStream
- When asked where to stream, select RTMP/RTMPS
- Paste the appropriate information, including your RTMP/RTMPS URL or Stream URL that you’ve copied from TeamSnap ONE, into the destination fields
- At this point, you likely need to return to TeamSnap ONE to ensure you’ve copied over the right details
- Save or confirm the destination if your app provides that option
- Choose your camera resolution
Resolution Tips
- Match your camera’s resolution to what you selected in TeamSnap ONE.
- If the resolutions don’t match, viewers will see the lower of the two
If your camera only supports insecure RTMP (not RTMPS), use the “Alternate URL” option in TeamSnap ONE to switch to an insecure URL and paste that instead
Step 4: Go Live From Your Camera
- In your camera app, start the live stream using the RTMP destination you set up
- Once the stream is live from your camera, you can share the link to watch with your team and family members from TeamSnap ONE
TeamSnap ONE will automatically detect that your stream is live:
- The setup modal will close
- You’ll see a notification in the app that your stream is live
- You’ll have the option to share the live stream link
You and your viewers can now:
- Watch the stream in TeamSnap ONE like any other live stream
- Use features like 60-second clip backs
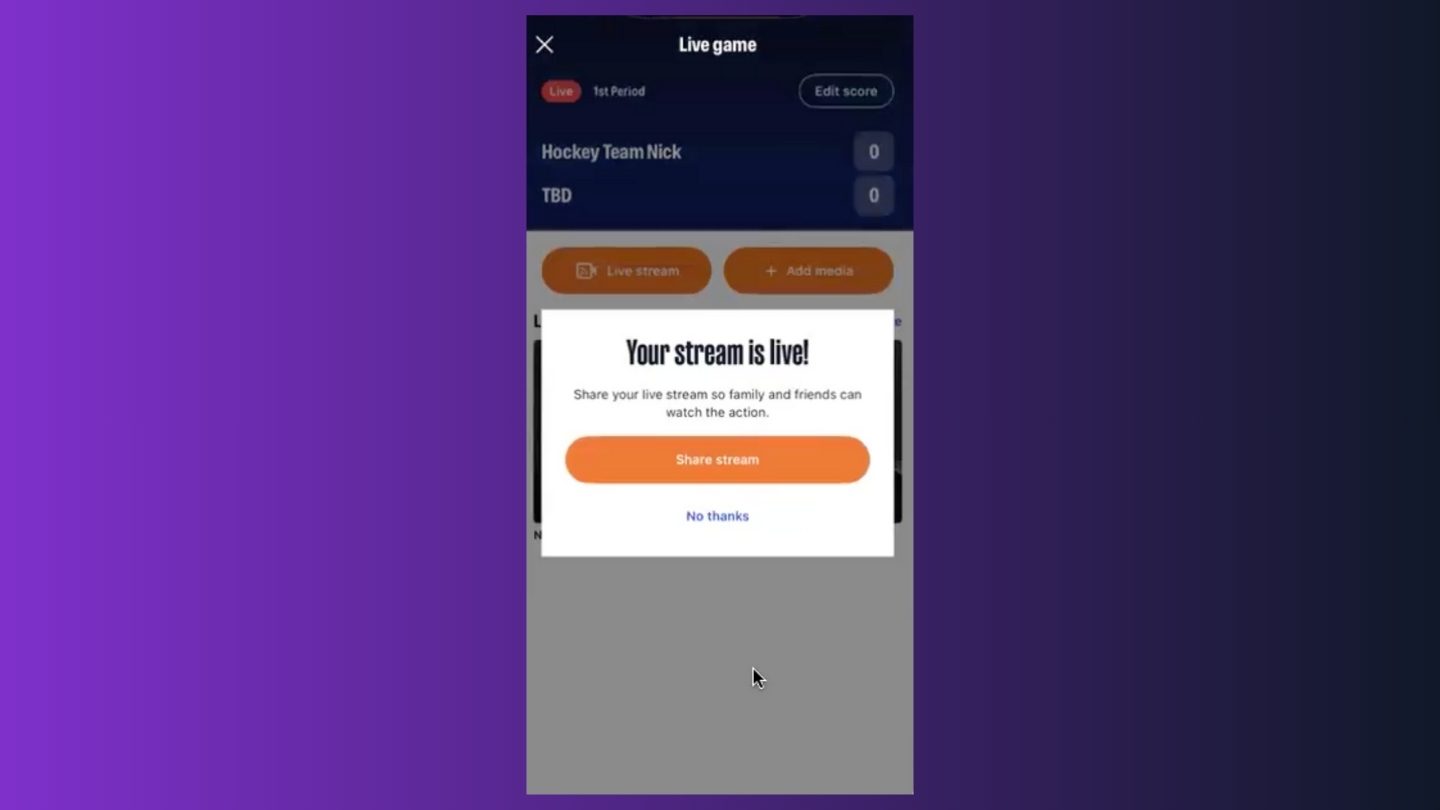
Step 5: Sharing Your Stream
Once your stream is live, everyone on your team will get a chat notification. In addition, contacts will be able to access a stream from the event details page.
We also understand that there may be family members or supporters who do not have a TeamSnap ONE account but want to follow along.
There are no restrictions, and the streamer, or any contact on their team, can share the game with anyone with a public web link by following these steps:
- During an active game, any team contact can open the game event details in the app or on the web.
- They can generate a unique web URL via the "Share Live Stream" button
- They can share this unique URL via text, email, or social media

Step 6: Ending the Stream
- End it from your camera app, not from TeamSnap ONE
Once the stream ends:
- TeamSnap ONE will stop receiving video
- The stream will automatically convert to a replay for that event after it’s processed
- There’s no separate “end stream” action needed inside TeamSnap ONE
Error Messages & Troubleshooting
On the screen with your RTMPS link, you will see an “Alternate URL” option to switch to RTMP if your camera does not support RTMPS, along with the “Stream URL” and “Stream Key.”
If something is wrong with the RTMP URL (for example, it’s invalid or not set up correctly), your camera app may show a failure message, and TeamSnap ONE will not detect the stream
In these cases, you’ll typically see an error such as:
- “Something went wrong” when attempting to go live
Most often, the cause is using an RTMP URL from the wrong event (old or incorrect).
If you see this:
- Go back to your event in TeamSnap ONE
- Confirm you’re using the current event’s RTMP URL
- Copy it again and paste it into your camera app
- Try starting the live stream again
Looking Ahead
We’re continuing to invest in Live Streaming based on feedback. In future updates, we’re exploring ways to improve the experience, including:
- Deeper integration with external cameras
- Expanding external camera support to Android devices